Here's another unconventional use case built with Airtable and Zapier: a retweet scheduler.
Here are the scenarios it should fulfill:
- Save every of my own Tweet that matches a given query, in this case all my mentoring-related Tweets
- At regular interval (daily), retweet one of them
- When it has gone through the whole list, start again at the top
Like the Know Your Company use case, I used Airtable as a Database and Zapier to create the workflow.
First implementation idea
The first started with the simplest idea I had:
- Upon initial saving of the Tweet, save the date
- Sort the list by this date
- Always retweet the oldest Tweet
- Update the saved date of the retweeted Tweet to today
This would have been gorgeous. Unfortunately, Airtable has an annoying limitation: it doesn't automatically apply table sorting. You can add a default sorting to a table but if you add an element, the sorting is not "re-applied" automatically. You need to manually apply the sorting again. This simply kills this workflow.
Unfortunately, this has been a feature request since... years... and doesn't seem to bulge.
Second (and working) implementation idea
The next idea is to add an ID to all the Tweets that are saved and always insert the new tweets at the end. Thus, have a table that is sorted per ID and I "just" need to keep count of which ID was retweeted last. When we reach the end of the list, we cycle back to ID #1.
I implemented this version with 3 different "Zaps" (Zapier workflows).
- Zap1: Save a new Tweet
- Zap2: Retweet a Tweet
- Zap3: Cycle the index if needed
- (optional) Zap4: Check Tweet's length
1. Save a new tweet
This Zap is straight forward:
- When a new Tweet is detected
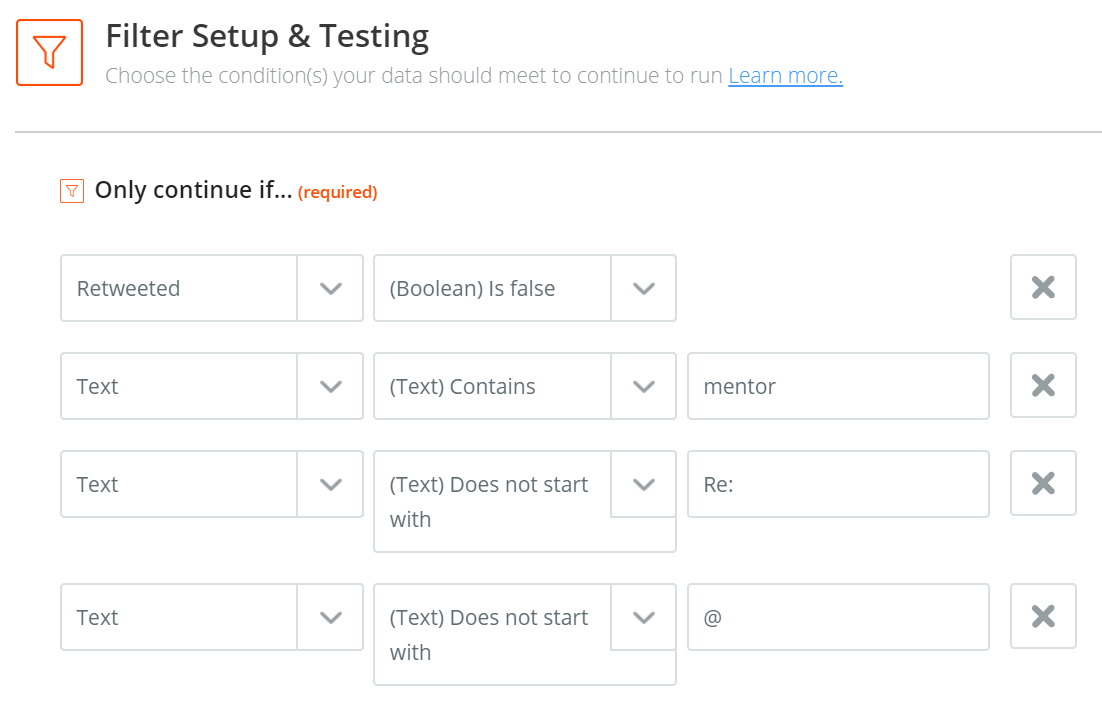
- If it is to be saved (filter below)
- Save it into Airtable
- Do some variable magic
Here's the filter:
At the end, this Zap increments a variable containing the number of Tweets saved.
2. Retweet a Tweet
Again, straight forward:
- Find the Tweet to be posted
- Post it
- Do some variable magic
To know which Tweet to post, I saved an index in a variable and update it manually. The variable is called "idToTweetNext". With this ID in hand, it is straightforward to query Airtable and get the correct Tweet.
When the Tweet is posted, I can increment the "idToTweetNext" variable so that it points to the next Tweet in line.
I also update the "LastPosted" date, which is not used by the logic, but might be useful for troubleshooting.
3. Cycle the index if needed
Let's assume I have 5 tweets in my database. When the 5th Tweet is posted, "idToTweetNext" will be updated to 6. I need to create some logic to tell it: "6 is out of bounds, go back to 1".
Unfortunately, Zapier cannot do real conditional logic. I cannot tell it something like:
if idToTweetNext = 5 then idToTweetNext = 1 else idToTweetNext = idToTweetNext + 1
The only logic Zapier knows are the "Only continue if" filters as described in the first Zap. So, my idea was to create another Zap (this third one) to do the following:
Only continue if "idToTweetNext" > "numberOfTweetsSaved" and then reset "idToTweetNext" to 1.
Further problem, Zapier filters cannot compare two dynamic values. The right-hand side of an operation can only be a static value.
So, I used the Modulo operator:
Only continue if the remainder of the division of "idToTweetNext" and "numberOfTweetsSaved" is 0, and then reset "idToTweetNext" to 1
So, I compute this modulo in a first step, and then only continue to reset it to 1 if the result was 0.
This did the trick. And that's why I saved the number of tweets in the first Zap.
4. Check Tweet's length
This is an extra Zap I could create. I add the 3 characters "Re:" at the beginning of the Tweets. Thus, I need to make sure that my Tweets are not longer than 277 characters. If I save a Tweet that is longer than this, I should send a notification to manually edit modify the Tweet. I didn't implement this Zap yet.
And that's it
I now have my fully working scheduler. If I don't touch it, it will continue re-tweeting my best tweets and bug by followers with the same ideas forever.
The tips and tricks
Beside the few limitations mentioned above, here are some tricks to help you do it yourself:
1. Key Value Pair storage
Zapier has a storage tool that acts like a key value pair. This would be quite useful... if you could see and change those values in a UI somewhere. But I could not find any. So, I had to create my own workflows to manipulate those variables.
In the end, I create a "KeyValuePair" table in my Airtable base and handled it completely outside of Zapier. Way easier. Too bad.
2. Incrementing Values
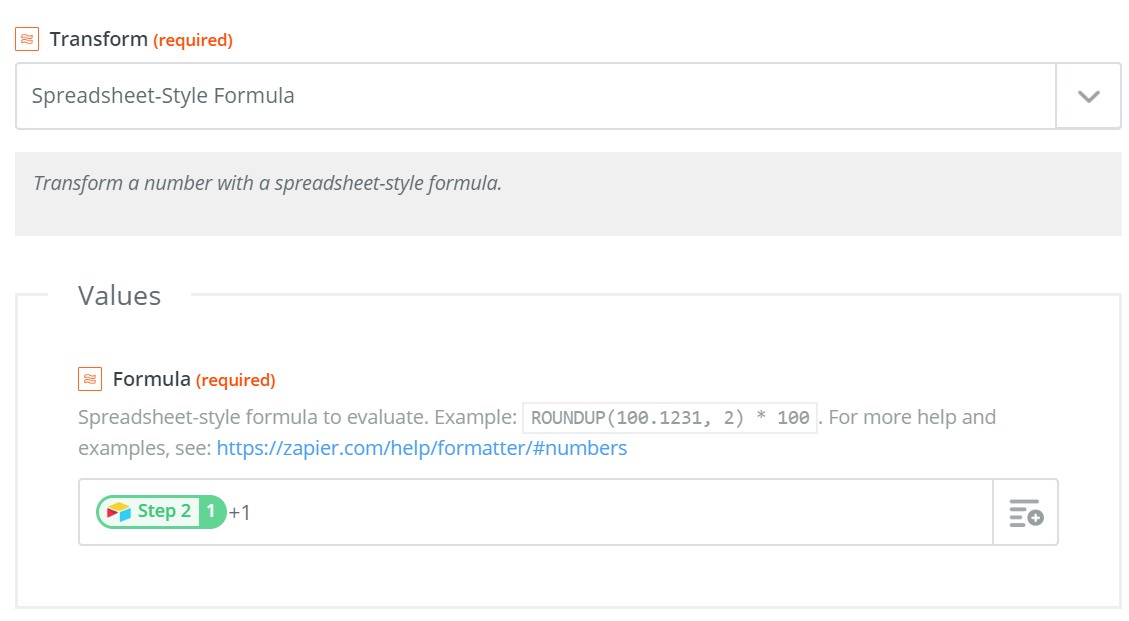
I didn't find how to increment numerical values in Zapier when storing a value. When I attempted to persist "idToTweetNext + 1", it interpreted it as a string concatenation. Like for example 1 + 1 => 11.
It is easy to solve with an extra step using a "Spreadsheet formatter" (which I also used for the Modulo operator):
Then you can reference this formatted value and store it.
3. Push
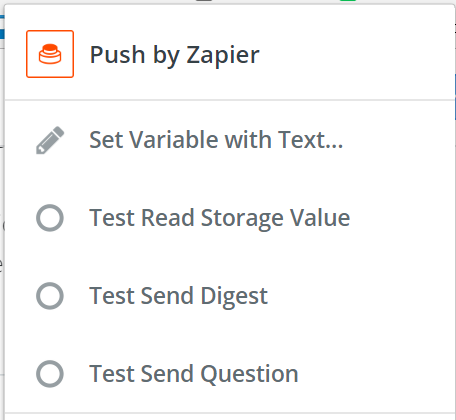
Zapier requires a first action to start. Even if you can hit "run" in the Zapier Dashboard, the first action must be a "trigger". The easiest trigger to use is a manual push, which is made via the Push Chrome Extension:
It can be a simple trigger, or a trigger with a parameter.
Conclusion
Again, I am amazed at the complexity of the workflow one can make with this tool combination. And beside the modulo trick, there is no logic or code involved.
Implementing this in Python or Ruby would also be very straightforward. But setting up and maintaining the infrastructure and deployment for it is overkill for such a microservice.
The sorting limitation in Airtable is annoying. I think I'm going to hit it a few more times by doing such workflow-based scenarios. This whole tool uses 15 Zapier steps altogether. Without this limitation, I could reduce it by half (@Airtable if you're reading this, please do something)!.
Also, for the sake of completeness, I have to say that I had to upgrade to a paid Zapier membership. The free tier doesn't allow you to make workflows of more than 2 Steps. It costs me $20 / month now. On the other hand, I currently don't use the advanced features of Airtable, so the free tier is enough now.
Now I need to go and revise my "Know your company" workflow and finally turn it live!
What would you do with this? What could I do next? Any fun idea?
Photo by Benjamin Balázs on Unsplash


